Trying Out Dialogue Inline Commands
Dialogue Inline Commands are powerful tools that help bind and utilize actions at specific points in text within the Dialogue Node Base Context's Context Text.
Dialogue Inline Commands are designed to be used on the cosmetic purposes such as playing sound or spawning particles, and not recommended to be used on the important gameplay logics since this can be vulunerable on an injection attack, Though we have a internal injection attack protector for the system.
Using Dialogue Inline Commands
Binding Inline Commands via Command Bind Editor
The Node Body of the Dialogue Node Base Context has a convenient button built in to assist in binding Dialogue Inline Commands to the Context Text. In this example, we'll explain using the Monologue Node.
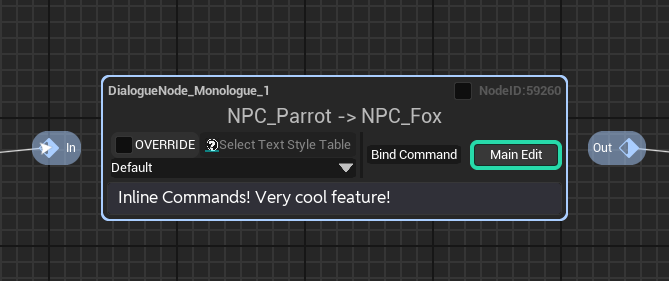
First, click on the part of the Context Text where you want to attach the command, and click the button labeled Bind Command.
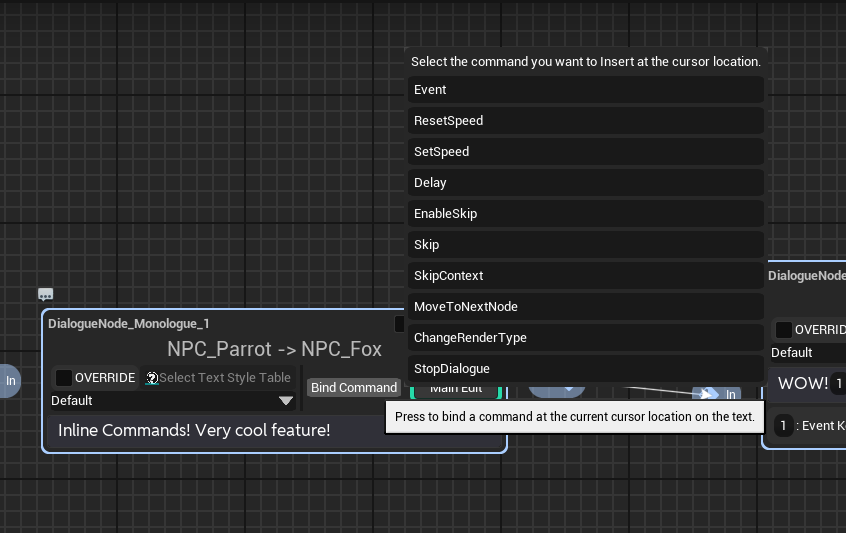
Then a menu will appear where you can select the inline command to bind. From various default commands, let's hover over the command labeled SetSpeed.
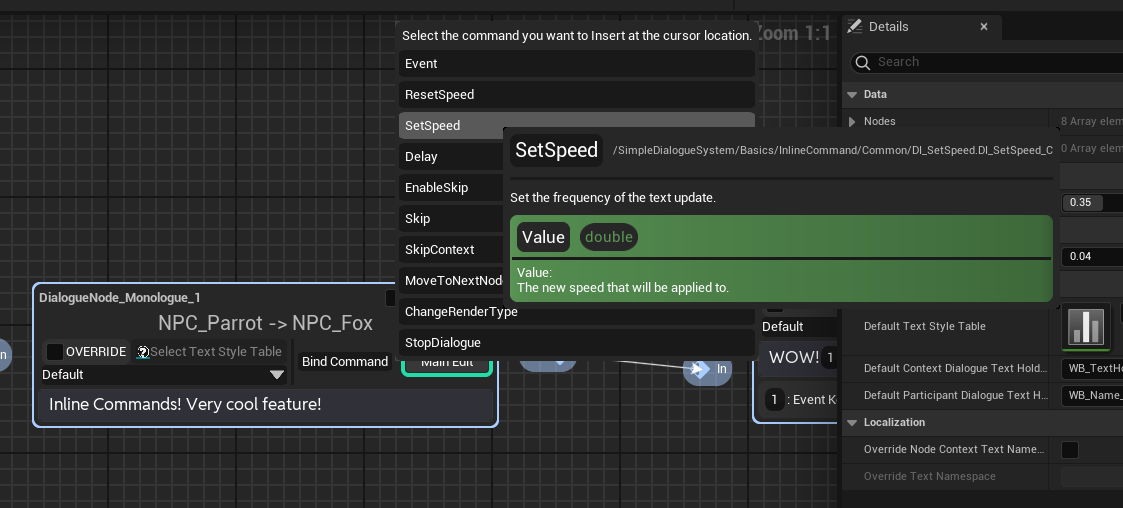
Here, you see a brief explanation of the SetSpeed command's functionality and an explanation of the attribute (parameter) the command uses, which is Value in this case.
Now, click on SetSpeed to bind this command to the text.
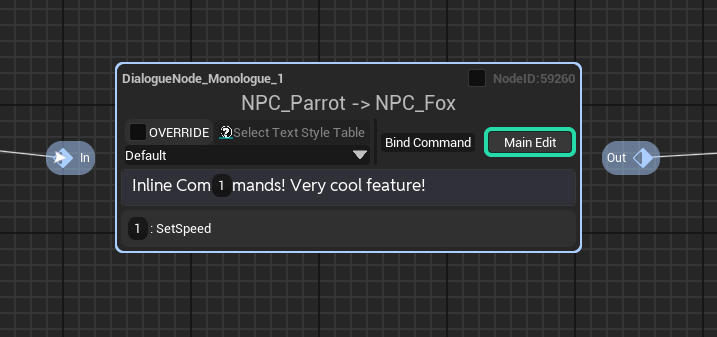
Voila! The SetSpeed command is now bound to the text.
A bound command is indicated by a button with the command's sequence on a black background. Below the text, a display box is added for each sequence, showing the full content of the command.
Now, when the dialogue widget updates the text and passes the part with our bound SetSpeed command, it will be triggered. Very simple, isn't it?
However, as we saw earlier, the SetSpeed command uses the Value attribute, and we haven't initialized this value yet. Let's change this value now.
Uninitialized attributes are automatically initialized with class default values.
Modifying a Bound Dialogue Inline Command
Click on the bound command displayed above the text.
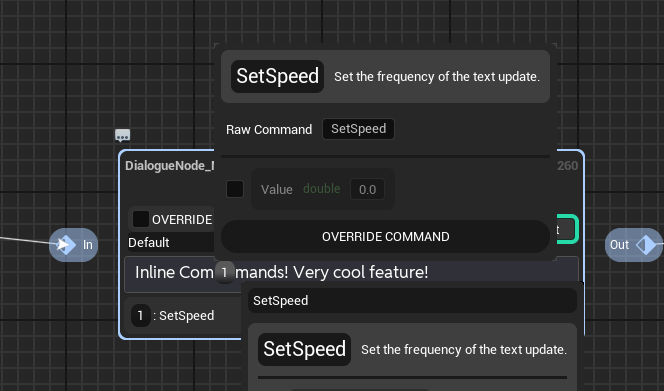
A menu named Command Editor appears. You can modify everything about the command, including its attributes. Let's focus on modifying the section for the Value attribute in the center.
Click the checkbox to the left of the Value attribute.
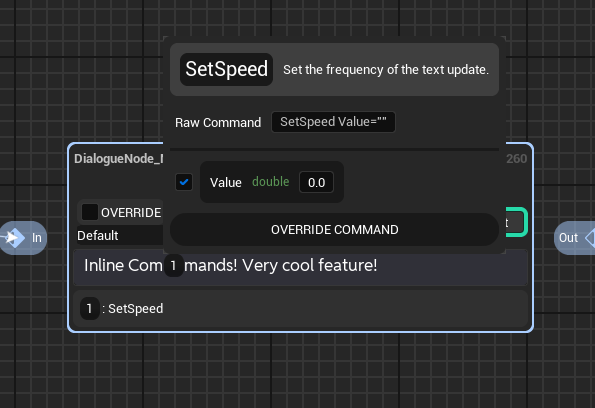
Now, you can see that the Value attribute's value has become editable. You also notice that the text "Value=" has been added to the Raw Command part. By checking the checkbox, we explicitly state that we want to initialize the value of this attribute. Now, you can modify this value as desired to control the behavior of the command. in this tutorial, We will set it to 0.2.
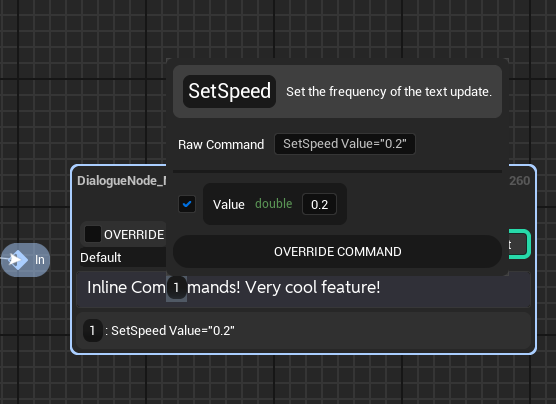
Once you've modified the value as desired, click on a blank area of the graph to close the Command Editor and save the changes.
Now, if you run the dialogue manager and trigger the inline command, you'll see that the update frequency of the dialogue widget's text changes as you've set.
Creating and Binding New Dialogue Inline Commands to the Project
Of course you can make a whole new Dialogue Inline Command in your project.
Open any Dialogue Manager and click on the Create Custom Inline Command button in the toolbar of the Dialogue Manager editor.
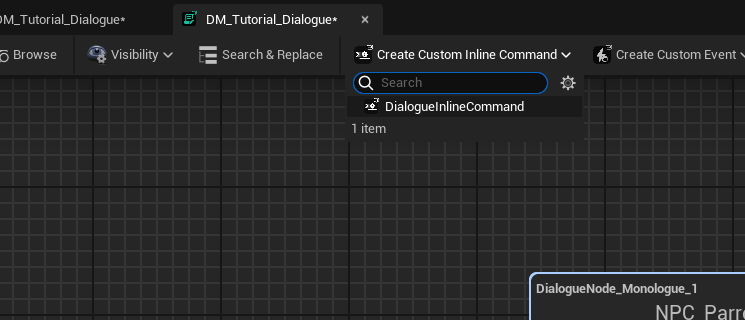
Select DialogueInlineCommand in the menu.
After creating the dialogue Inline Command asset, writing the Inline Command for that asset begins by overriding the following function:
For C++ derived classes:
virtual void ReceiveCommandTrigger(FExecutionRunStruct ExecutionRun, class UDialogueWidgetBase* Widget, const TMap<FName, UActorComponent*>& ConversationParticipants) override;
For Blueprint assets:
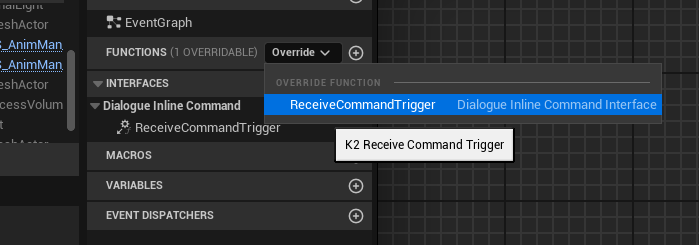
In this tutorial, since we are deriving the DialogueInlineCommand class as a child blueprint class, We are going to override the second function.
Write the logic here to be executed when the command is called.
Attaching Attributes On the Inline Commands
We call the arguments that can be parsed to the command instance, can be stored in text form and exposed to the Inline Command Editor as attribute. It's like the Value argument we saw above in SetSpeed Command.

You can attach new attributes by adding variables to the inline command and marking them as public or editable in instances.
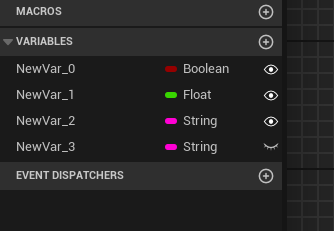
In this image, NewVar_0~2 will be implemented as attributes for the command, and NewVar_3 will not. (Though you can use it as just like the other bp variable.)
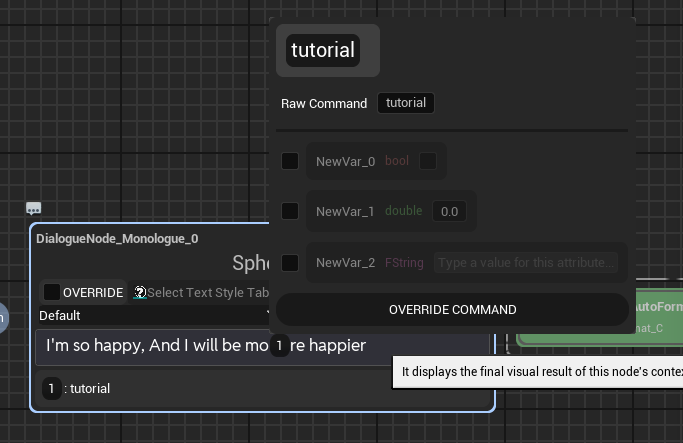
These variables automatically become attributes of the inline command. Attribute variables are displayed in the command bind editor, allowing you to specify values through the editor or by assigning values in text. Attribute variables are initialized with the specified values at the time of command execution.
Dialogue Inline Commands can use only the property types that can be stored in the string form and numeric form as attribute. The property types that can be attribute are as following:
- Boolean
- Numeric types (int, float, double...)
- Text (With a transient key and namespace. You can not localize this text.)
- String, Name
- Byte Types (Enums)
The property types can not be attribute are as following:
- Object, class reference
- Map, Array, Set, Tuple
- Struct
As you can see, It has a certain limits on some applications, and this is why we also support Dialogue Events! use Dialogue Events instead for this case.

The descriptions set in the class settings and the descriptions of variables marked as public are displayed as explanations for these variables in the command bind editor. This provides a more intuitive and convenient way to use commands.
Registering Dialogue Inline Commands in Node Classes
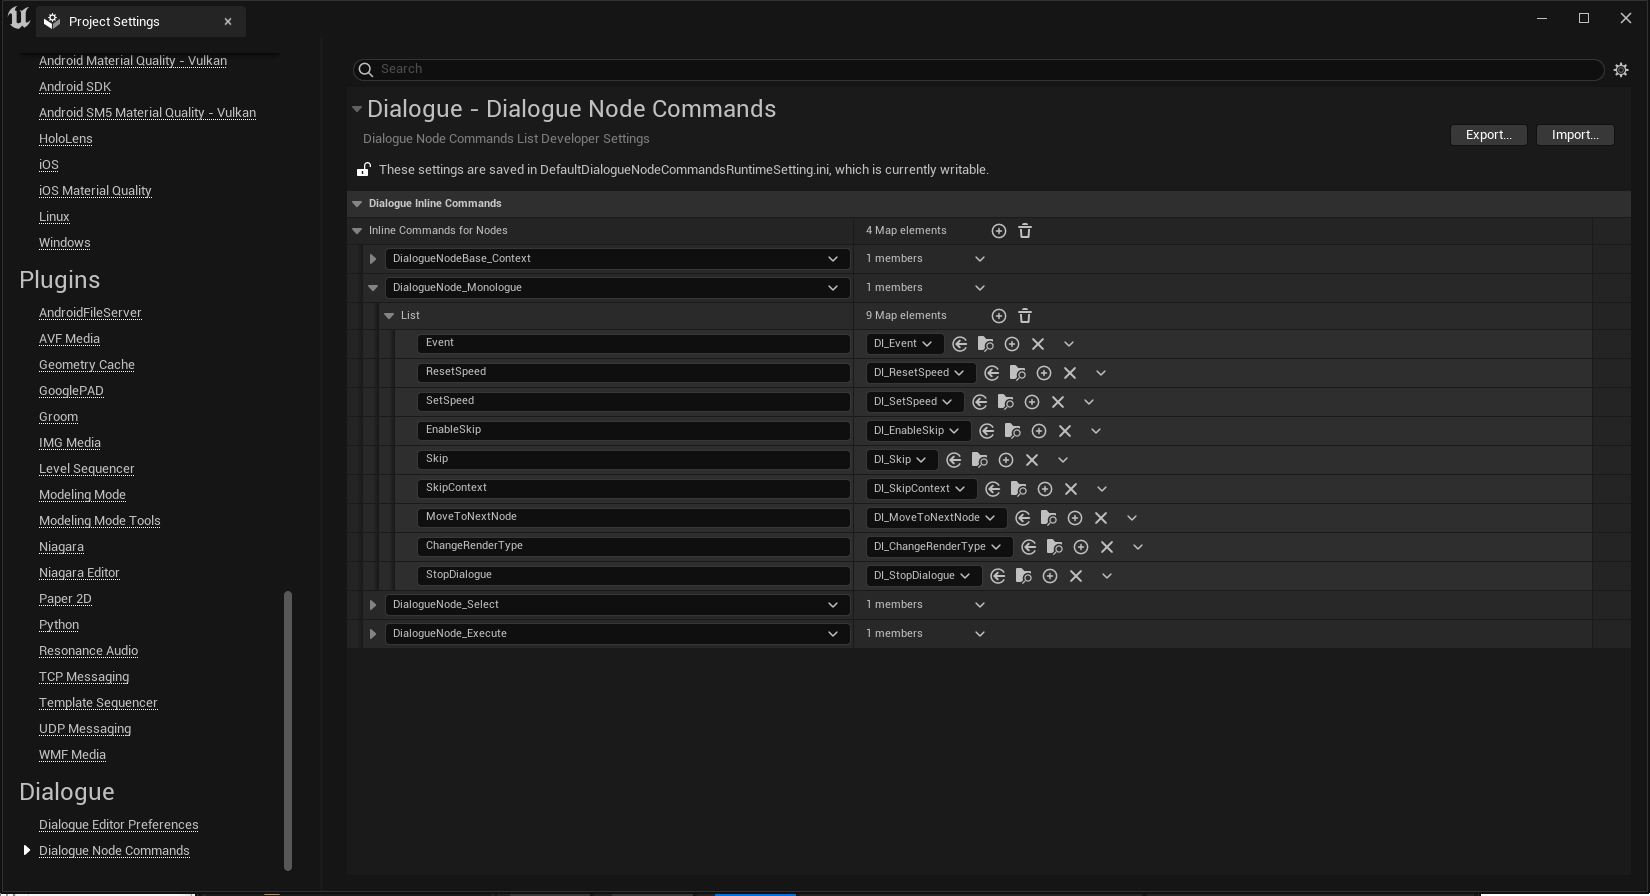
In the editor's project settings tab, in the Dialogue Inline Commands section, you can register the dialogue inline command class to be used for each dialogue node class. You can register the created dialogue inline command for the desired node class with the desired signature.
The command bind data is stored in the DefaultDialogueNodeCommandsRuntimeSetting.ini file in the Config folder of the project's root directory.
The string value that command bind elements have is called a signature. (e.g., Signature of the DI_Event inline command: Event) This signature is used to call the command in the Context Text, so it is advisable to choose a concise and descriptive signature.
Advanced
The subsequent explanations are for advanced users.
Directly Binding Dialogue Inline Commands
Having registered the signature to the Context Text earlier, you can now bind the command directly to the text.
As mentioned before, when the dialogue widget updates the text and encounters text in the [[signature]] format, it executes the command corresponding to that signature.
Binding Dialogue Inline Commands with Attributes
You can include attributes with the inline command signature to provide arguments for the command when it is executed.
To use attributes, enter the attribute's name, followed by an equal sign and the value inside double quotes. Each attribute is separated by a space. With these considerations, you can bind an inline command with multiple attributes as follows:
[[signature attribute1Name="attribute1Value" attribute2Name="attribute2Value" ...]]
Similarly, if you don't initialize the attribute, the class's default value will be used.